In 2024 I began writing text for the Plant Good Seed Company website. In a moment when developments in language generating technology were beginning to rapidly sow even more imprecision in the already deeply unreliable world of online gardening advice, I was constantly trawling for the relief of viscerally REAL "content". Real as in empirically deduced through repeated experience and phenomenal interaction. Not copy and pasted, but lived and cushioned in a careful exposition of its specific context. Nothing when it comes to plants is an isolated fact, and we should hold in suspicion any advice that masquerades on the purely platonic plane of alleged universality.
I was wanting to contribute to the style of information I found most useful and valuable for myself. And a drop down "Planting Details" field on the product listings of the PGS website seemed as good a vehicle as any to publish what I might have to contribute to the Field of Study of Interacting with Plants. So an ongoing catalog of experiences is fomenting towards a maybe forever future seed catalog as Quin and I populate the "Planting Details" of the plants we feel like writing about. Below I have excerpted some of my contributions in text and photograph.
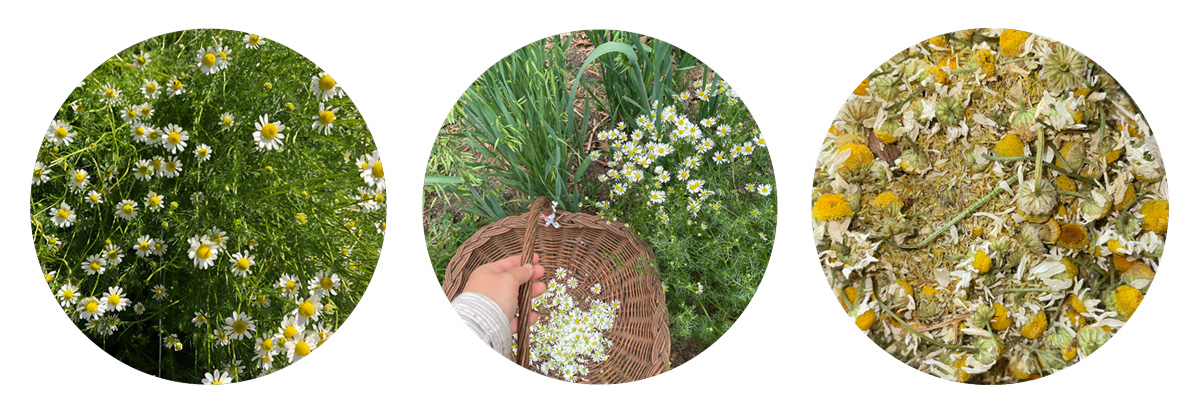
Chamomile (Matricaria chamomilla) prefers cooler weather, so is best started alongside other early season crops like peas and spring greens. Whether you are seeding in trays indoors or directly into the ground, scatter the tiny seed into the surface of the soil and gently pat in to establish good contact and keep the seed from blowing or washing away. The seeds require some light to germinate, and although warmer temperatures might speed up the process, they will also happily come up in cooler soils.
You don't need to thin, as chamomile seedlings will clump up and grow fine in close quarters with one another. But if you do want to divide up a clump to get more plants, you may - their roots are not super sensitive (despite being quite thin). Just be gentle as you untangle them and be aware that the transplant will slow their growth.
Chamomile will survive even with lower-maintenance, and after establishment may not need constant watering if there happens to be even a modest amount of early summer rain. That said, its roots are fairly shallow, so observing the plant and making sure it has adequate water will provide higher yields. Results will absolutely vary with your soil type - in sandy, acidic soils I've seen chamomiles grow no taller than 10 inches; and I have also been knee deep in chamomiles almost 3 feet tall, grown in a raised bed amended with some compost.
Flowers will arrive by early summer, and picking them once a week will not only provide you with tasty soothing tea, but will also contribute to more bloom production. The plants will start petering out with the arrival of hotter temperatures - flower production will slow and stalks will start turning yellow. Leave them to encourage self seeding for next season, or use the garden space to plant a quick growing warm season crop like beans.
In zone 7b I have had chamomile self seed over the winter, and the rosettes coming up in late February and early March successfully handled light late frosts and produced the nicest, lowest-maintenance chamomile patches I have ever grown - so depending on your USDA zone you could experiment with winter sowing in addition to hoping for self-seeding.
For the home apothecary of a small, chamomile-loving household, I'd recommend growing at least 3-5 plants.
I first became interested in fava beans (Vicia faba) when I saw them happily growing between the cracks of some stone pavers in Quin's yard during a winter visit to Ojai - any food plant that volunteers without irrigation in Southern California is worth further examination in my book. Quin gave me a pile of beans from a bucket of "off-types" and this was my entry into the world of fava.
Favas, also sometimes called broad beans, are considered one of the oldest domesticated legumes, with earliest evidence of cultivation taking place more than 10,000 years ago in the Southern Levant. They have a higher protein content than most other pulses, and are a very common food to this day across the SWANA and Mediterranean regions. Although their use and cultivation is less widespread in North America, their food value and their high capacity for nitrogen fixing as a cover crop has led to much bioprospecting research into fava as a dominant crop of the future. On a more approachable scale, smaller ecologically minded growers on this continent have long recognized the value of this plant, and therefore there are a handful of interesting and distinct varieties available to work with.
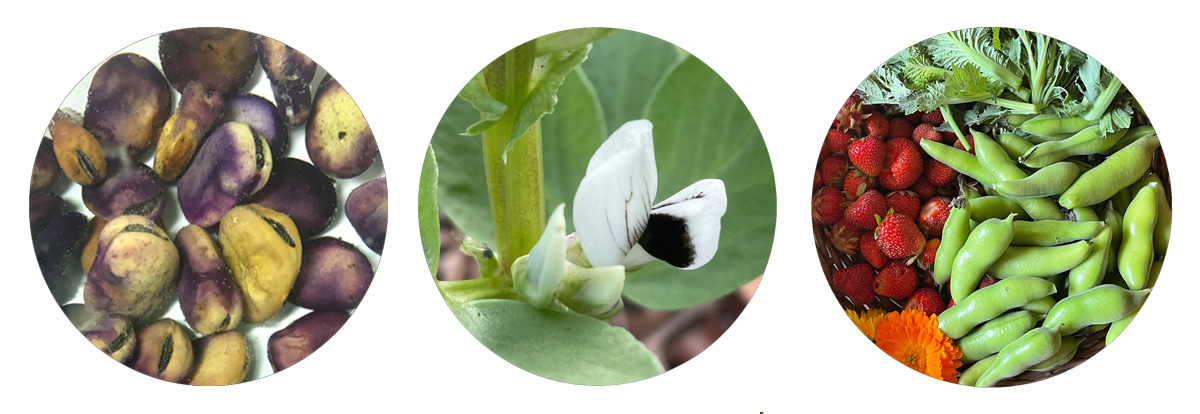
Although you don't need to soak favas before planting, I find it easier to do this step than to keep them adequately moist to germinate once in the ground. Larger beans like favas require a soaking time of 48-72 hours. Carol Deppe describes this process with nuance in The Resilient Gardener, but the basic gist is that you want to keep an eye on the soaking beans - change out the water at least once a day rinsing the beans to make sure you don't get undesirable bacterial growth. Observe the beans - they will be ideally ready to plant when you can see the root tip (the radicle) about to emerge from beneath the now more translucent seed coat. Any bad seed will float to the top and you can eliminate it. This process not only speeds up germination but also lets you in on a part of seed development that usually happens invisibly underground.
Even though it is interesting and kind of fun, many people eschew the soaking process and plant dry beans directly into the ground, especially if they are working with larger quantities. There is some disagreement in the literature about optimal germination temperatures for favas, with citations ranging everywhere from 42-70 degrees Fahrenheit. Here in the mid-Atlantic I have had luck growing it on a schedule similar to peas - planting well before last frost in early March and harvesting beans by June. Whenever you choose to plant, do so at a depth of about 1" and be gentle so you don't damage the emerging radicals if you did pre-soak.
Higher temperatures will inhibit growth and yields, so this is definitely a cool season crop anywhere that has hot summers. Although I have personally not experimented with fall sowing, favas are frost hardy to an extent, and there are varieties that can survive various ranges of freezing temperatures. If you live somewhere with mild-to-medium-cold winters and want to seed favas in the fall to harvest in the spring, this might be worth investigation and some trials!
Favas have an upright bushy growth habit, and most common varieties offer a stunningly unusual coloration of a white flower with a black spot. The beans can be harvested as a fresh shelling bean when the pods are plump, hard, and shiny bright green; or as a dry storage bean when the pods are brown, dry and crunchy. I hear that the shoots of the plants are tasty as well, and that when harvested very young, the beans can be eaten with their pod as a green bean. My own experiments with the latter have led to some hairy and fibrous chewing, so it seems like catching it at the perfect moment for the "green bean" stage is an art to develop over time.
If you are growing favas as a cover crop, for best results you are encouraged to mow down the crop right after it begins flowering and leave the cuttings to rot in place - this will keep the maximum amount of fixed nitrogen in the soil, instead of it being expended again in the plant's formation of its seed.

Garlic is typically planted in the Fall - within two weeks on either side of your first frost date. Break up the bulb, separate the cloves, and tuck each one, still covered in its papery wrapping, about an inch into the soil. I tend to mulch the bed lightly after planting, and add more mulch around the sprouts once they emerge.
Watch your garlic grow slowly through the winter, and pick up pace as the weather warms. In early summer, look out for the loopy scapes - this is the flower stalk of your garlic. It is considered best practice to cut these back before the flowers open, in order to encourage the plant to put its last burst of energy into sizing up its bulb below ground. Garlic scapes have become a farmers market delicacy in the past decade - people pickle them, process them into pesto, and add to dishes for a garlicky bite somewhat more mellow than the flavor of the garlic bulb itself. While I agree with the common wisdom of cutting back the scapes - consider letting one plant go to flower and seed if you have never before seen a garlic in bloom!
Garlic lets you know it is ready for harvest when the bottom two or three leaves of the plant turn yellow and brown. Like with most root crops, you will have best luck harvesting when the soil is relatively dry. Use a digging fork or a shovel to lift them - don't try to pull them straight up out of the ground by the leaves.
Although you can eat garlic immediately after harvesting it, if you are hoping to store some for any length of time, you will need to cure it for a few weeks. You can shake off any excess loose soil as you harvest, but don't worry about getting them super clean yet, and definitely do not wash them - keeping the bulbs dry during this time is imperative to be able to store your garlic for a long time. Keep the leaves on the plants and bundle 5-10 of them together with some twine. Hang them to dry out somewhere with adequate airflow but no direct sunlight. The exact timing of your curing process will depend on things like the humidity in the air, but generally 2-4 weeks should do it. All the leaves will turn brown, the papery layers outside of the bulbs will get a little crisp, and you'll be able to tell the garlic just feels like the garlic you're used to having in your kitchen.
At this point you can cut back the leaves - make sure to leave almost an inch of neck above the bulb intact - cutting too close to the bulb can expose the bulb to rot. You can also wipe off any remaining dirt, which should now be dry and come off easily with your hand or a dry rag. You can keep some of your garlic in the kitchen for daily use, but if you have a big crop, you can store the remainder in paper bags somewhere cool. The dark and the cold temperatures will delay the bulbs' desire to eventually sprout, and you can bring more into the kitchen on an as-needed basis.
Compared to other root crops like potatoes and yams, garlic is not very needy about its curing and storage process. You will likely have success without being super specific about things like temperatures and humidity levels. I suspect that one reason for this is that garlic is one of our most anti-microbial vegetables, easily fighting off the forces of aging and decomposition that can more quickly befall some of our other food roots. This same feature makes it a powerful ally during surges of respiratory infections, most effective if taken regularly as a preventative measure or at the very first signs of illness. There has also been a good amount of research showing that it benefits cardiovascular health by reducing blood pressure, and that it has positive effects on the gut microbiome.
Although cooked garlic is not devoid of health benefits, it seems like you can get the most from your garlic by consuming it raw. Breaking down the cell walls allows it to release its healthful powers, so always cut, crush, grate or chew. Eating it straight can induce an unpleasant gag reflex, but there are many ways to get around this. Thinly sliced garlic is delicious on top of a buttered piece of toast and grated garlic is tasty in a salad dressing. If you are going to eat it on its own, I recommend mincing it and then washing down a spoonful with some water, or mixing it with some honey.
Hot peppers require consistently warm temperatures to germinate and in the absence of a greenhouse will benefit from accoutrement like cold frames, heating mats, or even low-rent methods like a punctured plastic bag slipped over a seed tray. These things are extra useful because in many growing zones, peppers need to be started while the weather outside is still quite cold - 6 to 8 weeks before last frost.
Figuring out how to give enough light and warmth to their seeds and seedlings however may be the most challenging aspect of growing hot peppers - once you've got that down you'll likely find them less needy than other garden veggies. I generally find hot pepper varieties more vigorous and less demanding than their bell pepper cousins - maybe it is their tendency to form smaller fruit, or the fact that once this fruit forms, their heat is a natural deterrent to many common garden thieves.
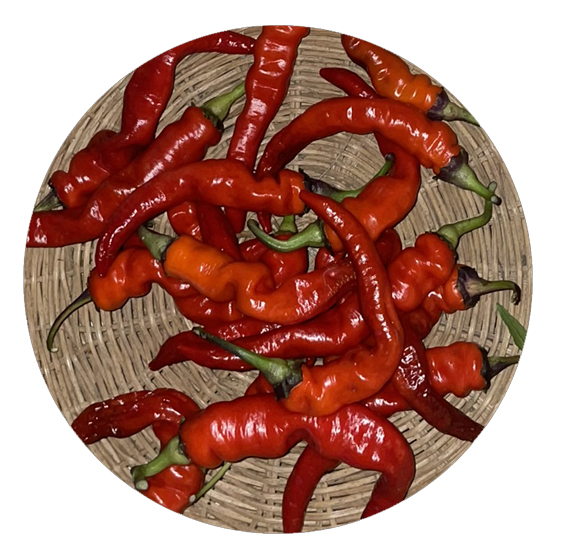
Most varieties do benefit from some kind of staking - either of the individual plants, or entire rows. While most peppers ripen into a final bright red stage, which will also usually provide the highest level of spice, many are picked and eaten at earlier stages when their specific flavor is less masked by the sheer heat. If you are picking peppers to save seed however, you will want to wait till they've reached their final mature color before harvesting.
Beware! The capsaicin present in hot peppers is quite caustic - it can cause a painful burning sensation on your hands which can be transferred to other places you unwittingly touch. When working with peppers it is highly advised you wear gloves, and possibly even a respirator mask if you are handling large quantities. Cooking or even dehydrating them can release eye stinging and cough inducing particles into the air, so make sure you have decent ventilation available when doing these things.

I first became aware of this variety when Quin sent me some seeds he had saved from a single plant he acquired at the 2018 Heirloom Seed Expo. Both of us were drawn by the unusual coloration of the fruit - they start out dark purple, and as they mature cycle through gorgeous tones of lavender, salmon, orange, and maroon before finally reaching the classic cayenne bright red. Soon I learned more from my friends at Truelove Seeds, who had acquired the variety and the attached stories from William Woys Weaver. Apparently the Buena Mulata was one of a batch of pepper varieties stewarded in the first half of the 20th century by the Greater Philadelphia area painter and gardener Horace Pippin.
I had first encountered Pippin's work at the Barnes Foundation in Philadelphia, where it boldly stood out among its mostly European Impressionist neighbors. His work is gorgeous and strikingly real, and to me appears "ahead of its time" both aesthetically and conceptually - it portrays his experience fighting in WWI, tight scenes of domestic life back home, almost fairytale-like Biblical visions, and symbolic depictions of contemporary realities. From this article in the Reading Eagle I learned that he started painting after returning from the war, partly as a way to process the multivalent horrors he experienced there, and partly as physical therapy for an arm injury he had sustained in combat.
Pippin had friends in the Black catering community of Philadelphia, and it seems like this was the source of his pepper collection. Many of the peppers he stewarded stand out for their showy and unusual coloration, and everytime I visit the Buena Mulata plants in my garden I think of him and easily see why they would have appealed to the artist. At the same instance in time, each plant bears purple, pink, orange and reddening fruit - all in a display that reminds me that whilst for humans art can be a valuable redemptive and therapeutic process, the earth is the greatest painter.
While much can be said about the appearance of these peppers, their flavor is also standout. They have a somewhat smoky undertone to their spice, especially if harvested while still not quite fully ripe. Throughout the summer I add them to salsas and use them in stir fries. Near the end of the season I harvest and dry a big batch. To do this I cut them open and lay them out to dry on a screen in the sun for a couple days. In my humid climate I need to finish off the drying process in the dehydrator before storing the peppers away. The dried peppers can be used in all sorts of ways - as part of bean broths, in soups, ground up and sprinkled... I like to use them alongside fennel seeds to make a chili oil, which I eat through the winter as a reminder of the heat and the colors that will inevitably return to the landscape after a few dark months.
For those curious to learn more about Pippin's peppers, I recommend this Seeds and Their People interview with William Woys Weaver, whose grandpa traded Pippin pepper seeds for bee stings.
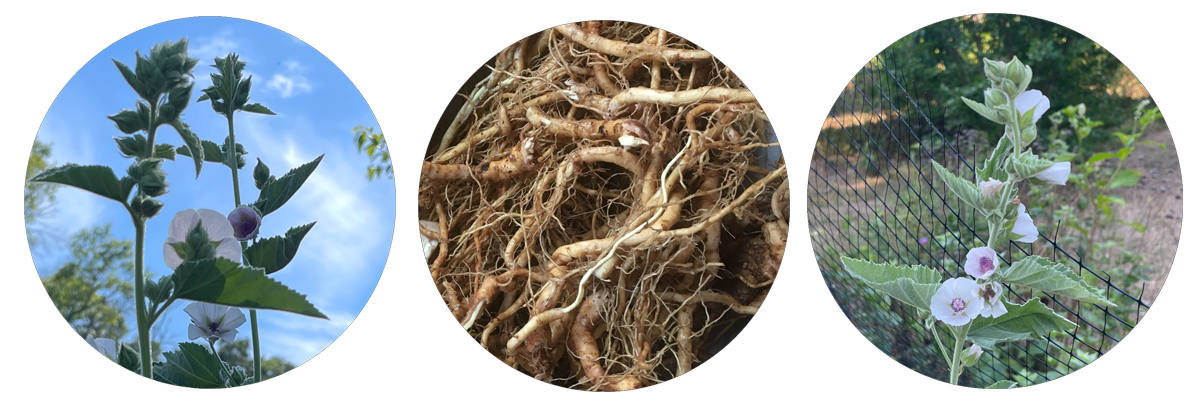
Marshmallow (Althaea officinalis) seed germination will be sped up and made more reliable by light scarification before planting - gently knick the seed coat with sandpaper or a small blade. This will make it easier for water to penetrate the seed and kick off the growth process. Cover the seed with a very light layer of soil and pat it in to establish good contact.
As the word "marsh" in the name indicates, this mallow likes water - consider planting in a damper spot in the garden, or remember that providing regular water will help it grow to its fullest expression. That said, I've abandoned marshmallows to their own devices in sandy dry soils and still had them survive and even eventually flourish - they seem to be quite adaptable.
In the first year of growth, this plant may only produce a single stalk, but patience is rewarded as in the second, or possibly third, year you will have a robust shrubby mallow up to 5 or 6 feet tall producing lovely white flowers all summer long.
Through the summer you can harvest and dry the leaves to make a mild tasting, lightly mucilaginous tea. The leaf, the flower and the root are indicated for soothing agitated internal mucous membranes and can provide some relief to a sore throat, an upset stomach (especially where the stomach lining may be compromised such as with ulceration), or urinary tract issues. The anti-inflammatory and healing-by-soothing functions of this plant have been investigated in numerous animal and in-vitro studies.
Most literature suggests waiting till year two to harvest the root, but year three might be even better - judge whether it's ready to be dug up by the size and condition of your plant. Roots are best dug in the fall, after the plant stalks have died back, and you can replant the root crown after removing three quarters or so of the root for use. To store, wash the root right after the harvest, and cut up into small chunks with sharp pruners. The smaller the pieces the easier it will be to dry. Lay out to dry and once initial moisture has evaporated, you can finish off the drying process in a dehydrator if you have access to one. Otherwise, a dry shady place with some airflow should work fine.
To prepare the root as tea, you will need to simmer it for about 15 minutes. If you want to add marshmallow root to a tea blend, you can powder the root in a coffee grinder - this way you can just steep it in hot water as you would with dried leafy herbs. Powdered herbs are said to lose their potency faster, so I recommend grinding up only as much as you need for single use.

This passionflower (Passiflora incarnata) is native to the southeastern United States and with warming winters has been creeping up to overwinter successfully in the mid-Atlantic and even the northeast. Some sources cite it as being "woody" in hotter climates, but I have never encountered evidence of it being anything other than a senescent vine no matter where it's grown. This means it is a perennial vine that dies back every winter and grows back up from the ground in the early summer.
Like many of the North American natives, it's a bit of a challenge to start from seed. Some suggest using cold stratification to mirror the plant's natural life cycle. Others have had luck soaking the seeds for 24 hours in warm water prior to planting. To help break through the tough seed coat, the seeds may also be scarified (lightly nicked to facilitate the entry of water into the seed) with a light sandpaper or small blade. Be patient - germination can be prolonged (3 to 6 weeks) and sporadic; not all seeds will come up at once.
Because this vine is a perennial, you may have best luck starting it in the spring, potting it up into a larger container over the summer, letting the roots develop for several months, and then planting it out into the garden in the fall. It will require some attention and care as it gets established over the first year or two.
After that your only concern will be reigning in its joyfully uncontrollable growth. So be mindful where you plant it! Once established, it will spread prolifically underground, and the 30ft vines will reach far and wide in every direction. For this reason, it's best to plant it where you can give it lots of space and where you're happy to have a wilder looking and feeling zone.
It will beautifully climb and cover any fence or trellis that it can cling to with its tendrils, but it will also spread over ground and create a lush ground cover. Regardless of growth habit, it is difficult to describe the effect of its ostentatious purple and white blooms popping off all summer long (June-September here). In a corner of my South Jersey yard this vine has interplanted itself with pokeweed (Phytolacca americana) and cup plant (Silphium perfoliatum) and this is easily the most lively part of the garden - profusely buzzing with bumblebees busily zipping from flower to flower and dodging butterflies and moths at every corner. Here it is definitely host to the variegated fritillary caterpillar, to the south and west of here it also reportedly hosts the gulf fritillary.
It appears to be a profoundly useful plant to our insect neighbors, and can also be very useful to us! You'll likely get fruit production happening by the third year. Although it seems that there is a lot of reported variability in flavor, the PGS seed stock came from particularly delicious fruit that in my opinion compare well to the tropical ones that cost $8 a pop at the supermarket. Fruit is fully ripe and at maximum sweetness when its bright green color starts yellowing and it falls off the vine. Just tear it open and slurp up the fruit - you can chew up and eat the crunchy seeds or suck off the jelly fruit and spit them out. Here the fruit starts ripening in September and continues through mid-October. Harvested earlier than that it'll be more sour, which can also be nice.
The leaf and tendrils are a popular nervine - a calming and sleep-supporting herb often found as a key ingredient in grocery store sleepy tea blends. It's not a particularly delicious flavor on its own - kind of grassy and nutty and strange - but I do find that a strong cup of the dried herb steeped for 15 minutes or so can really help calm down the system and move it closer to sleep. It's also indicated for spasmodic pain and can provide some relief for things like menstrual cramping.
The leaf also has cited historical use as a "pot herb" - a leafy plant cooked with oil or water as a green, sometimes with other types of greens. I enjoy snacking on the crispy vine tips in the garden, and sauteeing the shoots and tops of the vines in olive oil with some garlic. Older larger leaves are OK cooked too, but feel a little more challenging to digest, whereas the young greens cook down super soft kind of like spinach.
A word on the "aggressive" growth habit - this vine will become a "weed" if you plant it in a small, orderly garden. This is not the ideal place for it. But given room to grow, it is fairly easy to manage - you can mow down the edges of the planting to keep it from spreading endlessly. Because the stems and the leaves fully die back every winter, it will not strangle out trees or shrubs that it climbs over. And because it climbs using tendrils instead of vining around branches, it's easy to pull it off of the things you don't want it to grow over. I have grown potatoes and beans in cleared patches totally surrounded by passionflower. This requires a regular removal of the passionflower in the first half of the summer, but it's a fairly quick and simple weeding job that leaves me with a bushel full of consumable leaves. The shoots stop coming up by the end of the summer and leave the cultivated patches mostly alone. Standing in those patches and hearing the loud buzzing on the insects darting all around is a special experience and I wonder if this is what gardening sounded and felt like in some more insect-filled past.
On the NC State Extension website I found a note listing this plant as having an "extreme flammability" rating. I assume this is due to the fact that it produces a large mass of light dead plant material come winter, and this should be taken into account when planting in areas prone to fire. In places where fire danger is generally low though, this same feature acts as an organic-matter builder as the dead leaves rot in place.
If you want to save your own seed - wait to collect the fruit until it has fallen off the vine and is almost verging on rotting - its outer skin turning yellow and getting thin and papery to the touch. Squeeze the fruit pulp and seeds into a bucket or bowl, add a little bit of water, stir well, and leave to ferment in a hot sunny place for a couple of days. Cover it to avoid attracting bugs. Wash and decant once the pulp is fully fermented and separated off the seed, dry the seed in the sun fully before storing away.
A note on the conflicting info about woodyness of the vine and the toxicity of the non-fruit parts of the plant - I suspect that this arises from confusion between the Pasiflora incarnata and the more tropical Pasiflora edulis. But even the latter has been cited as having popularly consumed leaves by the National Institute of Health. There have been a number of bioprospecting studies into P. incarnata as a verified "antioxidant," and a potential aspect in treatment for dementia, parkinsonism,seizures, and things like anxiety and depression.
If you desire more info, this post from Chestnut Herbal School of Medicine has some interesting stuff about the botany aspects of the plant, the etymology of the name "Maypop," and more.